
How to Build an Outdoor Pizza Oven?
Wouldn’t it be a pleasure to have an outdoor pizza oven for house parties and gatherings? Even if you do not have an outdoor kitchen, you could still have an outdoor pizza oven in your backyard, just where you set up your barbecue. Mingle with friends and family having yummy pizzas during summers or curl around the hot oven during winters enjoying wine and pizzas. Cooking under the sky, outside your monotonous kitchen, could be enthralling at times with the hot food, great company, outdoors, and a wood fire.
Well, for a change, if you decide to rack up pork belly chops, lamb shoulders, pork ribs, or beef ribs, you could use the oven nonetheless. A pizza oven can also be used for slow-cooking meat. Just remember to cover the meat in a tin foil so that they turn tender and succulent and don’t get burned. A DIY outdoor pizza oven is one of the cheapest projects and a great investment if you tend to organize a lot of parties or gatherings.
HOW DOES A PIZZA OVEN WORK?
This small masonry craftwork can crank up to temperatures higher than your kitchen oven. This type of oven can deliver you chewy and perfectly cooked pizza within a couple of minutes cooked at a very high 750-1,200 degrees Fahrenheit. You also get the rich and smoky texture that the wood imparts, something you would not attain with your kitchen oven.
It would be better to consult your local permitting department to gather information regarding zoning restrictions associated with such constructions. Before building an outdoor pizza oven, you might have to check and get approval from the Homeowner’s Association (HOA) in case you live in a townhouse controlled by the HOA.
HOW TO BUILD AN OUTDOOR PIZZA OVEN?

There are different types of pizza ovens depending on the size varying from small clay ovens to huge concrete ovens. You choose which one to build can depend on a few factors such as the things you’d like to cook in it, your budget, space constraints, time, etc.
If your backyard is completely uncovered, then maybe you would like to build the oven on a wooden crate so that you could move it during snowfall or rainfall. As you might already know that the construction might weigh as much as half a tonne, so you would have to use a forklift or a pallet truck. If you have a partially covered backyard and wouldn’t want to move the oven from its position, then you could build a brick stand underneath so that the oven reaches your waist when stood in front of it.
REQUIREMENTS
• Sharp general purpose sand with small amounts of aggregate in the mix
• Aggregate
• Builders sand
• Cement
• A pot for the chimney (optional)
• Spade
• Trowel
• Heat resistant bricks
• Large cellophane sheet
• Some pieces of wood or foam
• Chipboard (if you are constructing on a pallet)
• Wooden pallet
• Drill
• Wood saw
• Wood screws
The exact quantity of the requirements per se would vary according to the size of the oven you intend to build. If you build it step by step, you wouldn’t have to collect everything according to their exact quantities at the beginning itself. Also, do not forget to use heat resistant bricks only; in case you persistently cook at high temperatures, the normal type of bricks would expand and crack the oven.
STEP-BY-STEP INSTRUCTIONS ON HOW TO BUILD A PIZZA OVEN
Step 1 ~ Constructing the base.
First of all, decide the place where you want to keep your oven and then lay the pallet horizontally on that location. If you are building it in your backyard, then the land would certainly not be flat; hence, place some cut off wood under the pallet to raise and level the base.
After you’re done with the pallet, chop off the chipboard in a size that would perfectly fit the pallet using a wood saw. Then cut 50mm high strips of chipboard for creating the perimeter bordering the top of the pallet. There should be no significant gaps b/w the boards as it has to act as a seal to hold in the concrete filling.
Form a concrete mixture in a 1:2:4 ratio with cement, sharp sand, and aggregate, respectively. Spread the concrete mixture in the wooden mold using a spade. For a flat and best finish, you could also use a long wooden baton lengthways to spread the concrete. The top layer made of concrete is going to become the floor for your backyard pizza oven, so make sure it is as smooth and level as possible.
Step 2 ~ Arranging the bricks according to the planned size.
Do not fix the bricks permanently in the first go. First, arrange the bricks to check whether they are in the correct position before fixing them permanently with cement. If you have got the standard bricks, then try to cut them into halves so that you could give a proper shape to your oven. Arranging the bricks into a rough layout is quite necessary to know whether you like it that way and also to know how many of them are going to be needed in the final construction.
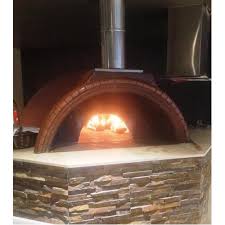
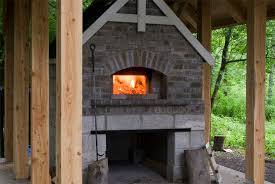
Step 3 ~ Creating the arch for an outdoor pizza oven.
The creation of the arch is necessary to provide a roof for the area from where you would get to access the inside of your oven. The arch is supposed to be two-thirds the height of your oven as a whole. Use foam, off-cuts from the remaining chipboard, or layered cardboard to create the curved support for the archway bricks to rest upon. You will definitely require this support at least until the curved archway bricks are drying. A curved archway is beneficial is some sense than a flat one because the bricks which are resting upon each other can be used to provide support.
Step 4 ~ Fixing the bricks in place with cement.
Create a fine mix of cement and sand in a 1:3 ratio and use the mixture to cement the first layer of bricks. It would be better if you would start cementing the arch in its place. Now, lay the cellophane sheet across this layer of cemented bricks and then begin to fill sand. Creating a sand mold inside the oven is very important because the sand acts as a support to the bricks while they get firmly cemented. The sand is either spread over the cellophane sheet or a plastic sheet so as to prevent it from sticking to the oven’s inside, where the cement might still be wet.
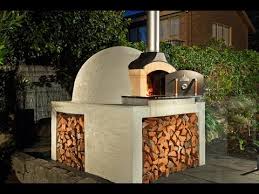
Along the sides of the cellophane sheeting, you can start layering bricks, and if in case you are planning on planting a chimney, then you might as well do it at this stage. Build the chimney a bit higher than the oven’s door so that while you are cooking, the smoke escapes through the chimney and not the door. We know that by now, because of all the cementing and concrete grounding, your oven might look like a total mess, but don’t worry because it will be mended in the next step.
Step 5 ~ Applying concrete to form the outer layer of the outdoor pizza oven.
Once again, form a concrete mixture of cement, sharp sand and aggregate respectively in a 1:2:4 ratio. Then spread it generously over the entire structure of your pizza oven. Now even if it’s impossible to be perfect but still try to spread it evenly over the structure and level or smoothen it. After this process, you will notice that the pizza oven looks far better than before, and now it will provide better insulation for your oven to remain hot for longer.
Step 6 ~ Remove the supports and sand.
It’ll probably demand a couple of days for the concrete to dry completely, after which you could remove the supporting foam or chipboard from under the archway. This way, you will get access to the bag of sand which was left inside the oven. Now by carefully ripping off the side of the sandbag, you can begin digging the sand out of the structure. After you feel that you have dug out the majority of the sand, you can pull out the sheet, which will bring out the remaining sand with it.
Step 7 ~ Create a small fire before cooking in your outdoor pizza oven.
You will have to create a fire inside the oven for its interiors to slowly dry up. Though it might have dried up by this time, this step will ensure that there is no crack formation due to the escaping steam. Now that your oven is all set to use, you could try to cook a pizza to see how your oven works. If you have built a chimney as well, then you would be able to see some pretty flames striking their heads right out of it while cooking.


