
How To Replace Kitchen Sink Drain

Changing a kitchen sink drain may seem like a simple task, but it plays a big role in keeping your kitchen clean and efficient. Over time, drains can get clogged, worn out, or outdated, leading to slow water flow or unpleasant smells. Whether you’re fixing a leak, upgrading to a better design, or giving your kitchen a fresh look, replacing the sink drain is a straightforward job. In this guide, we’ll walk you through the process in easy steps to help you complete the task without any hassle.
Tools and Supplies You’ll Need
Here’s a quick list of what you need to get started:
- A kitchen drain trap kit
- Sink drain and strainer assembly
- Tape measure to check sizes
- A marker to mark cuts
- A PVC tubing cutter or hacksaw for trimming pipes
- Pliers or channel locks to tighten connections
How to Replace Your Kitchen Sink Drain
Replacing a kitchen sink drain is a straightforward task with the right tools and materials. It’s a great way to fix leaks, clogs, or give your sink a fresh look.
Choose the Right Drain Kit
Start by selecting a drain trap kit that matches your sink type. Depending on your setup, you might need one for a single-bowl sink, a double-bowl sink, or one that works with a garbage disposal.
You’ll also find different material options:
- PVC Plastic: The most common choice because it’s affordable and practical.
- Chrome or Copper: Durable but less common since drains are usually hidden under the sink.
Make sure you pick the correct size. Most kitchen sink drains are 1.5 inches wide, while bathroom sink drains are slightly smaller at 1.25 inches. Choose a kit with smooth pipes to avoid clogs, as corrugated pipes tend to trap grease and food particles.
Checking and Adjusting the Trap Arm for Your Kitchen Sink
When replacing or fixing your kitchen sink drain, it’s important to check the height of the trap arm to ensure proper drainage. Set aside some time and gather the necessary tools. Clear out everything from under the sink to create space and place a bucket underneath the pipes to catch any water.
What is a Trap Arm?
The trap arm is the horizontal pipe that connects the P-trap (the U-shaped bend) to the drainpipe in the wall. Although it’s called “horizontal,” it should have a slight downward slope—about 0.25 inches per foot—toward the wall to let water flow smoothly.
How to Measure the Trap Arm
- Take a tape measure and check the height of the trap arm.
- Measure from the floor or the bottom of the sink cabinet to the middle of the trap arm.
- Use this measurement as a guide for your new pipe.
What to Do for a New Sink
If you’re replacing the sink, ensure that its depth matches your current sink. A deeper sink can make the trap arm slope incorrectly, which may cause drainage problems. If the slope cannot be adjusted, you might have to move the drain outlet in the wall, which can be more challenging and may need professional help.
By planning ahead and checking the trap arm height, you can ensure a smoother process when installing or replacing your kitchen sink drain.
Adjusting the Drain Outlet for a Deeper Kitchen Sink
If you’re replacing your kitchen sink with a deeper one, you might need to lower the drain outlet to ensure everything fits properly. This can be a tricky job, especially for beginners or those without the right tools. It involves cutting into the back of your kitchen cabinet and possibly adjusting the external wall if it’s made of brick or masonry.
If you decide to do this yourself, make sure to measure carefully to position the new P-trap correctly. Ensure that it’s easy to remove in the future for cleaning or clearing clogs. However, because this is a challenging task, it’s often best to hire a professional plumber to get it done safely and efficiently. Proper positioning of the drain outlet is essential for smooth water flow and a fully functional sink.
Cutting and Connecting Drain Pipes Made Easy
When you’re replacing the drain pipes under your kitchen sink, it’s important to work carefully and get the measurements right. If you’re using pre-cut pipes or cutting them yourself, accuracy matters to ensure a good fit and smooth drainage.
Steps to Follow
- Remove the Old Pipes: Start by carefully taking out the old drain pipes. If you’re unsure how to set up the new ones, take pictures of the original layout as you go to guide you later.
- Measure and Cut the New Pipes: If the pipes are not already the right length, use a small hacksaw or pipe cutter to trim them. Double-check your measurements before cutting to avoid errors.
- Attach the New Pipes: Install the drain trap and waste pipe using slip nuts and washers. Begin by tightening the connections by hand so you can adjust them if needed.
- Check the Waste Arm Slope: Make sure the horizontal waste arm has a slight downward angle, about 0.25 inches per foot. This allows water to drain properly and helps prevent clogs.
- Secure the Fittings: Once everything is in place and properly aligned, use pliers or Channel locks to tighten the slip nuts securely for a leak-free connection.
How to Check for Leaks After Installing Pipes
Once you’ve installed or replaced the pipes under your kitchen sink, it’s important to test for any leaks. First, turn on the faucet and carefully look at all the pipe joints to see if water is dripping. If you find any leaks, tighten the connections until they are secure.
Next, fill the sink with water by placing the plug in the drain. Once the sink is full, remove the plug and let the water drain out completely. Keep a bucket under the pipes to catch any water just in case there’s a leak. Check everything thoroughly and repeat the process until you’re sure there are no leaks. This will ensure that your new plumbing works perfectly without any issues.
Do You Need Plumber’s Putty for Kitchen Sink Drain Replacement?
Using plumber’s putty is a smart choice when replacing a kitchen sink drain. This versatile sealant helps to stop leaks and create a water-tight connection. It’s widely used by both professionals and DIY enthusiasts because of its ease of use and reliability. You can easily find it at hardware stores or online.
How To Replace Kitchen Sink Basket Strainer
Fixing a leaky kitchen sink basket strainer is a simple task that you can complete yourself in just an hour. By doing it on your own, you can save money and avoid the hassle of calling a plumber.
- Estimated Time: One full day
- Skill Level: Suitable for beginners
- Cost Range: $51–$100
Tools You’ll Need
- 4-in-1 screwdriver
- Two adjustable wrenches
- Hammer
- Locking pliers
- Rotary tool
- Slip joint pliers
Materials Required
- Plumber’s putty
With these tools and materials, you’ll have everything you need to replace your kitchen sink basket strainer efficiently and effectively. This easy DIY fix will help you eliminate leaks and ensure your sink works perfectly.
Step 1: Testing for Leaks
To check if the basket strainer is leaking, fill your sink with water and hold a tissue or paper towel under the strainer’s base. If the tissue gets wet, it means the strainer is leaking and needs to be replaced.
Step 2: Loosening the Coupling Nut
Use slip-joint pliers to loosen the coupling nut at the bottom of the basket strainer. Once it’s loose, slide the nut off the threads. If the strainer starts to spin while loosening, hold it steady with pliers or a similar tool.
Step 3: Removing the Locknut
To unscrew the locknut that secures the strainer, use a spud wrench or large slip-joint pliers. If the strainer basket rotates while unscrewing the locknut, insert plier handles into the strainer opening from above and use a screwdriver between them to hold it in place. This will make it easier to remove the locknut.
Step 4: Applying Putty and Installing the New Basket
Roll plumber’s putty into a thin rope and apply it around the edge of the sink’s drain opening. Press the new basket strainer into the putty firmly. From underneath the sink, attach the rubber gasket, friction ring, and locknut. Tighten the locknut securely, and wipe away any extra putty that oozes out.
Step 5: Handling Stuck Locknuts
If the locknut is stuck, spray it with penetrating oil to loosen it. For stubborn cases, use a rotary tool with a cutting blade to carefully slice through the locknut. Be cautious not to damage the sink. If needed, use a hammer and chisel to break the nut apart after cutting. Make sure to wear safety gear, especially eye protection.
Step 6: Picking the Right Basket Strainer
Choose a basket strainer with a high-quality finish and a reliable stopper. Spin-lock stoppers are durable, while twist-and-drop stoppers are easier to use but may need occasional O-ring replacements. Avoid strainers with plastic parts, as they tend to break easily and may not seal well, especially with hot water.
Steps to Install a Sink Strainer Without Plumber’s Putty
If you’re not using plumber’s putty to install a sink strainer, you can use a reliable alternative like non-water-based silicone sealant. It’s a strong and waterproof option that ensures a proper seal.
How to Do It
- Prepare the Sink: Clean the sink drain area thoroughly to remove dirt, grease, or any old sealant. A clean surface helps the silicone stick better.
- Apply Silicone Sealant: Squeeze a bead of silicone sealant around the edge of the drain opening. Make sure the layer is even and thick enough to create a good seal.
- Insert the Strainer: Press the sink strainer firmly into the drain opening on top of the sealant, making sure it’s aligned properly.
- Add Gasket and Locknut: From underneath the sink, attach the rubber gasket and friction ring. Then, hand-tighten the locknut onto the strainer to hold everything in place.
- Tighten Securely: Use a wrench or slip-joint pliers to carefully tighten the locknut. Don’t overtighten, as this may damage the strainer or the sealant.
- Wipe Off Excess Silicone: Clean off any extra silicone that squeezes out from under the strainer using a damp cloth.
- Allow Silicone to Dry: Let the silicone sealant cure for the time specified on the product label. This ensures a strong, leak-proof seal.
Why Use Silicone?
Silicone is a versatile and dependable alternative to plumber’s putty. It works well on various sink materials and ensures a durable, watertight connection for your sink strainer.
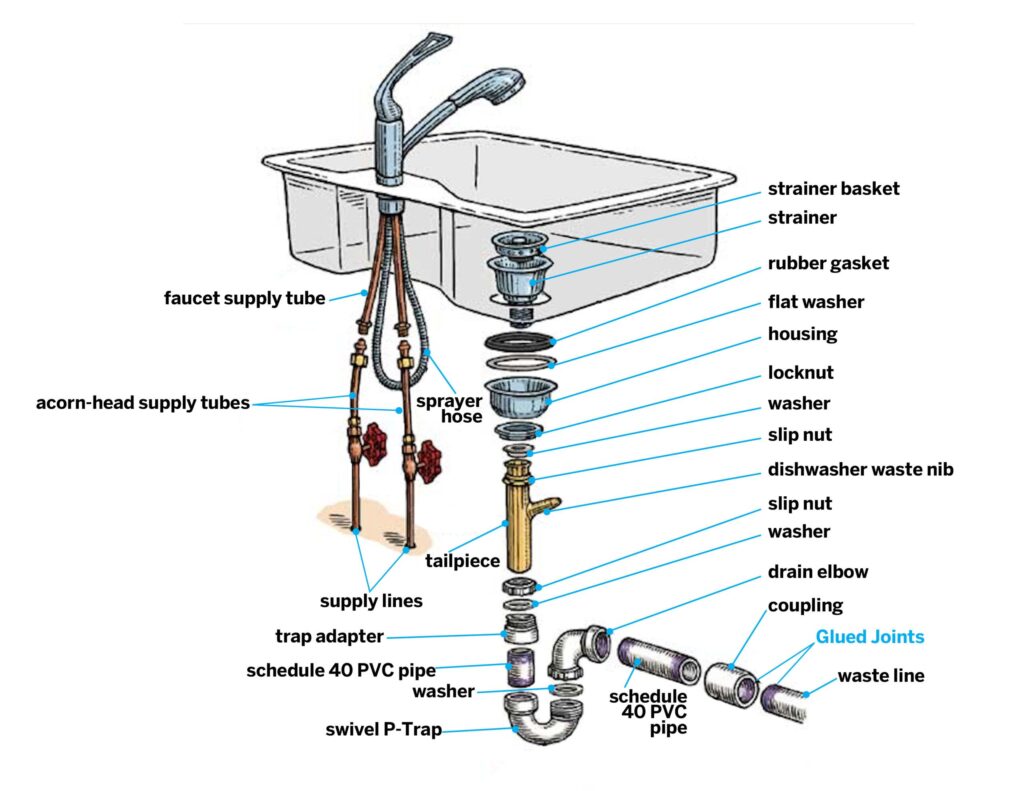
Kitchen Sink Drain Plumbing Diagram
Recommendation
How To Choose The Best Kitchen Sink Material
How To Fix Low Water Pressure In Kitchen Sink
How To Get Rid Of Very Tiny Ants Around Kitchen Sink
Best Drain Cleaner For Kitchen Sink: Chemical Or Home Made
How To Choose The Right Kitchen Sink Sizes
How To Remove Smell From Kitchen Sink?
How To Unclog A Kitchen Sink With Different Methods
How To Replace A kitchen Sink?
How To Choose Best Tiles For Kitchen Floor
How To Organize Kitchen Cabinets?
Mud Kitchen for Kids: The Ultimate Outdoor Play and Learning Experience
How to clean kitchen sink drain: A Step-by-Step Cleaning Tutorial
Tips & Tricks to Follow While Painting Kitchen Cabinets
How to Paint Kitchen Cabinets Properly?
How to Clean Kitchen Cabinets Thoroughly?
How To Install A Kitchen Sink Drain
Conclusion
In conclusion, replacing your kitchen sink drain and strainer is a manageable DIY project. By selecting the correct drain kit, carefully measuring and fitting the pipes, and properly sealing the strainer, you can effectively fix leaks and improve drainage. Remember to test for leaks after installation. With the right tools and a bit of patience, you can ensure a smoothly functioning and leak-free kitchen sink.
FAQs
Q: Can kitchen sink drains be replaced?
A: Yes, kitchen sink drains can be replaced. Over time, drains may wear out, get damaged, or become less effective, leading to issues like poor drainage or leaks. Replacing the drain is a common and straightforward fix that can improve your sink’s performance. With the right tools and materials, it’s a task that can often be handled as a DIY project, or you can hire a plumber for professional assistance.
Q: Do you need plumbers putty to replace a sink drain?
A: Silicone or plumber’s putty can both be used when installing bathroom sinks, drains, sink strainers, showers, or any plumbing parts that need a watertight seal. Both materials are effective and can help you get the same leak-proof result. Choose the one that works best for your project or preferences.
Q: How much does it cost to replace a kitchen sink drain?
A: In the United States, replacing a drain pipe typically costs an average of $696. However, the price range usually falls between $225 and $1,169. The total expense depends on factors like the material of the pipe, its location, and whether additional work, such as fixing drywall, is needed.
Q: Are all kitchen sink drains the same?
A: Kitchen sink drains are designed with a standard size, so the drain hole is always 3 ½ inches in diameter. This size is the same whether you have a single-basin sink or a double-basin sink. It’s larger than a typical bathroom sink drain and matches the size of a standard bathroom drain opening.


